

Preparing your 3D printer before printing
Before using the printer for the first time, it is a good idea to set it up properly at first to avoid unnecessary trouble. If you have basic FFF printer, we recommend at first to set the correct z-height, check the retraction setting with each material you use and don’t forget to spray the bed. For this calibration you will have to export a model to your printer with using Slicer.
If you are using new printers that have automatic head cleaning and touch leveling ideally with lidar nozzle flow measurement, you can skip these steps. Because the printer will do this for you.
Perfect First Layer
To have your printer calibrated well is the most important to achieve the best results. It is wise to calibrate you printer every time you assemble it or after changing the nozzle. When printing with some nice materials like Matte PLA on a perfect Z-Level, you can get perfect top layers which almost don’t seem to be printed by FFF.
At first, your print bed should be aligned with the print head and you can find those instructions in you 3D printer manual. A lot of printers use calibrating sensor to help you with aligning the bed. But you must not forget that to set the Z – 0 level correctly.
The most elementary way is to calibrate your z-level is with a piece of regular paper. You can also use it for aligning the whole bed.
There should be a space between the bed and the nozzle to fit the paper. When you are at Z-Level at 0 and you put the paper under the print head, you should be able to move the paper, but you should feel a light friction. When the paper hardly moves, the level is too low and if there is a space for two papers, the level is too high.
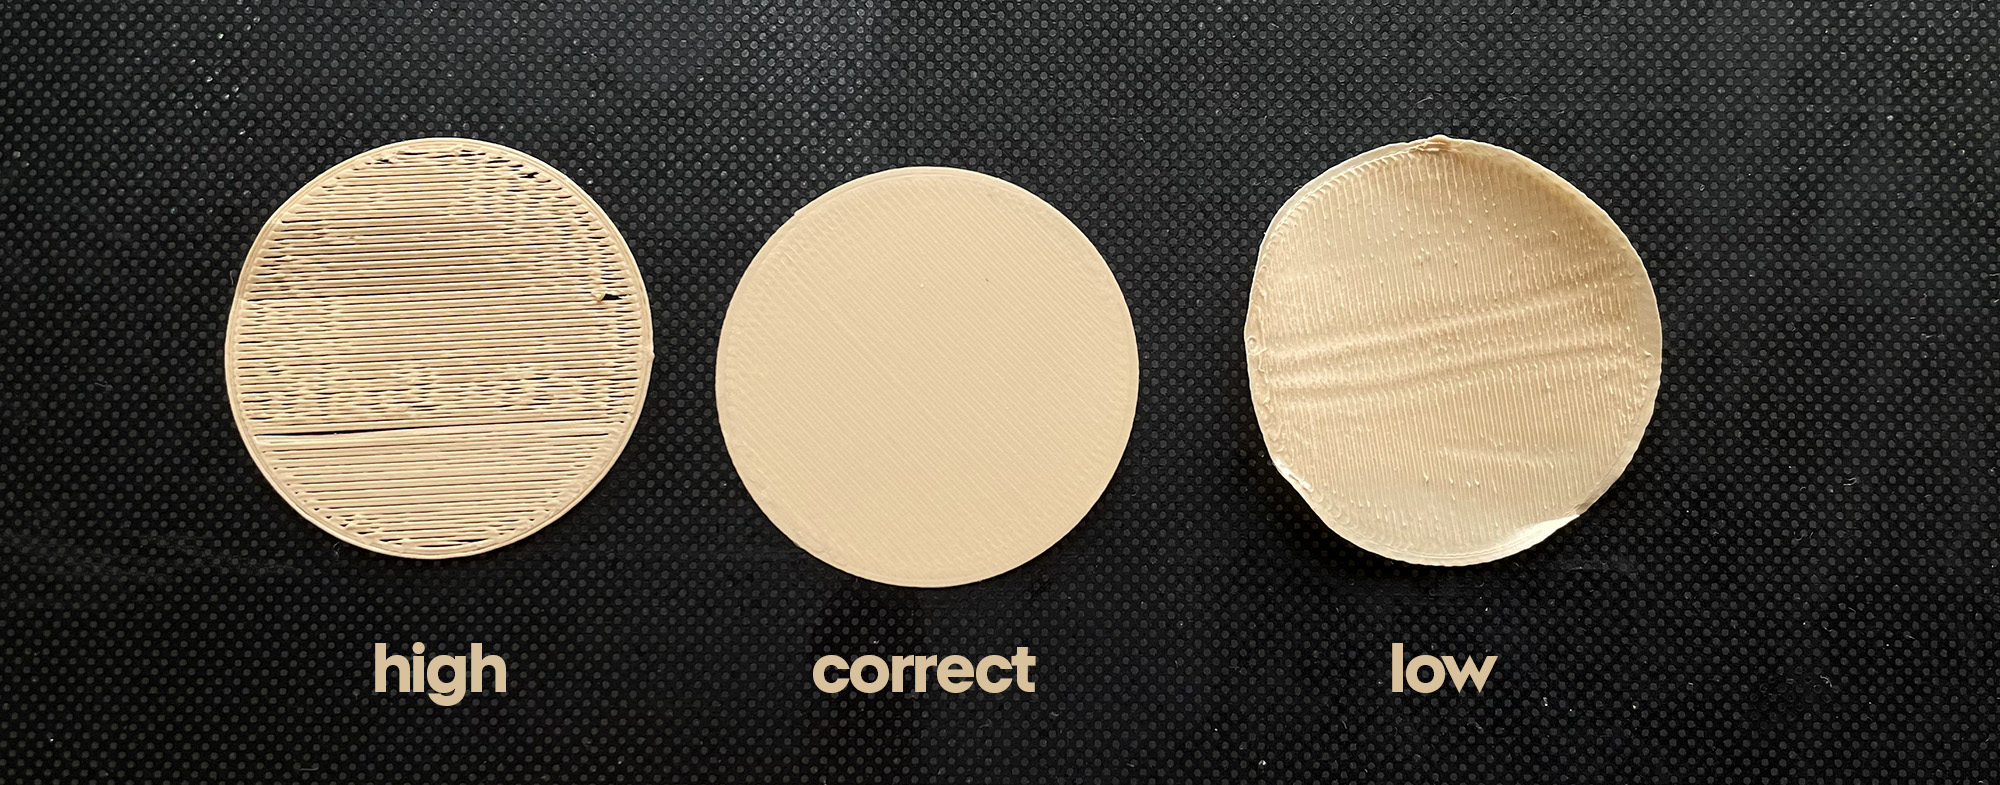
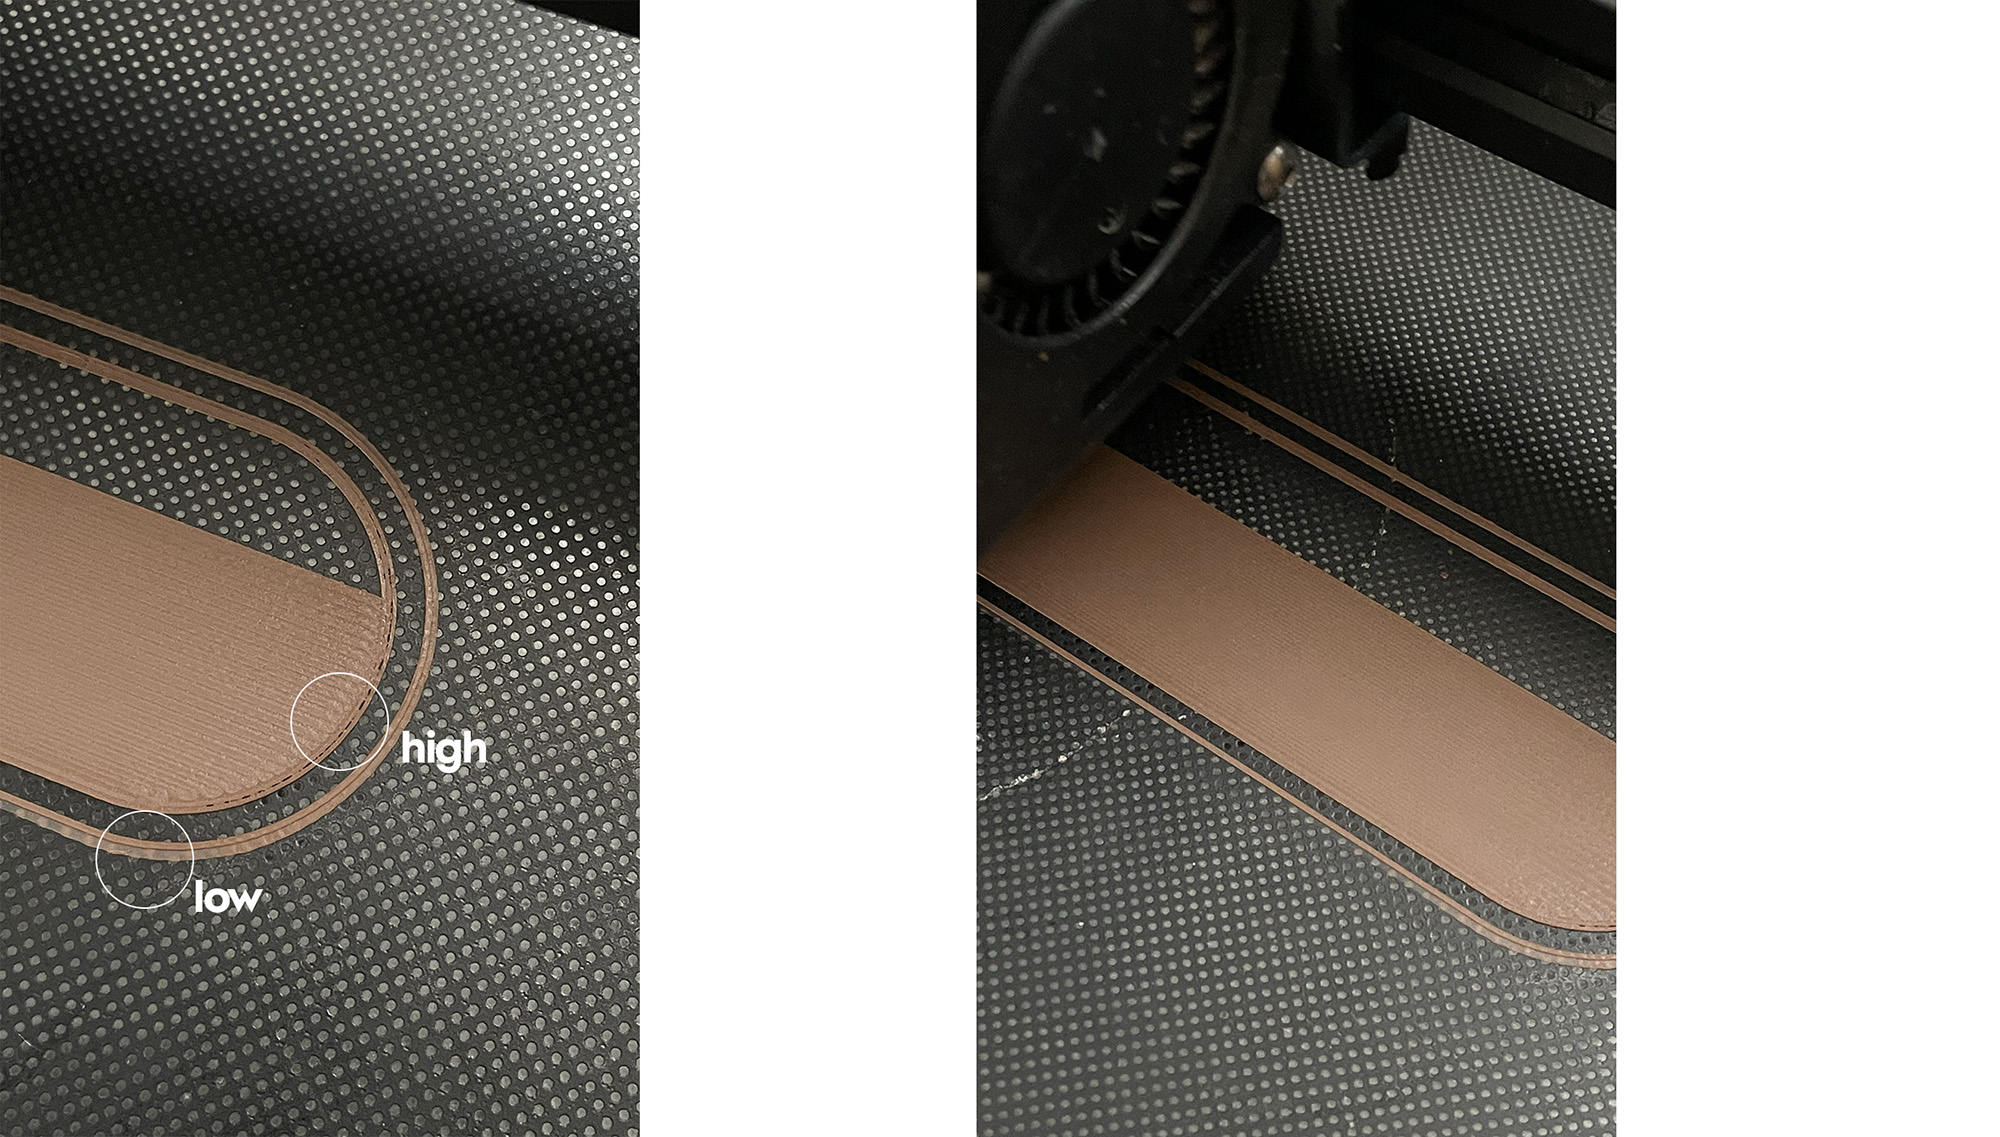
You can also adjust the z-level depending on what the first layer looks like. Layers should be connected perfectly with no gaps or overflow. When there are gaps between the layers, the level is high and when you see overflowing material, the level is low. And if the print is not visible at all, the level is way too low.
On very basic printers it is very easy to adjust the bed during the print with slightly turning wheels or screws.
Important note: when printing watertight prints, it is good to have a position a little lower or correct along with a flow setting up to 100% where it is good to see the bits a little overflow. It makes you sure, there are no gaps between layers.
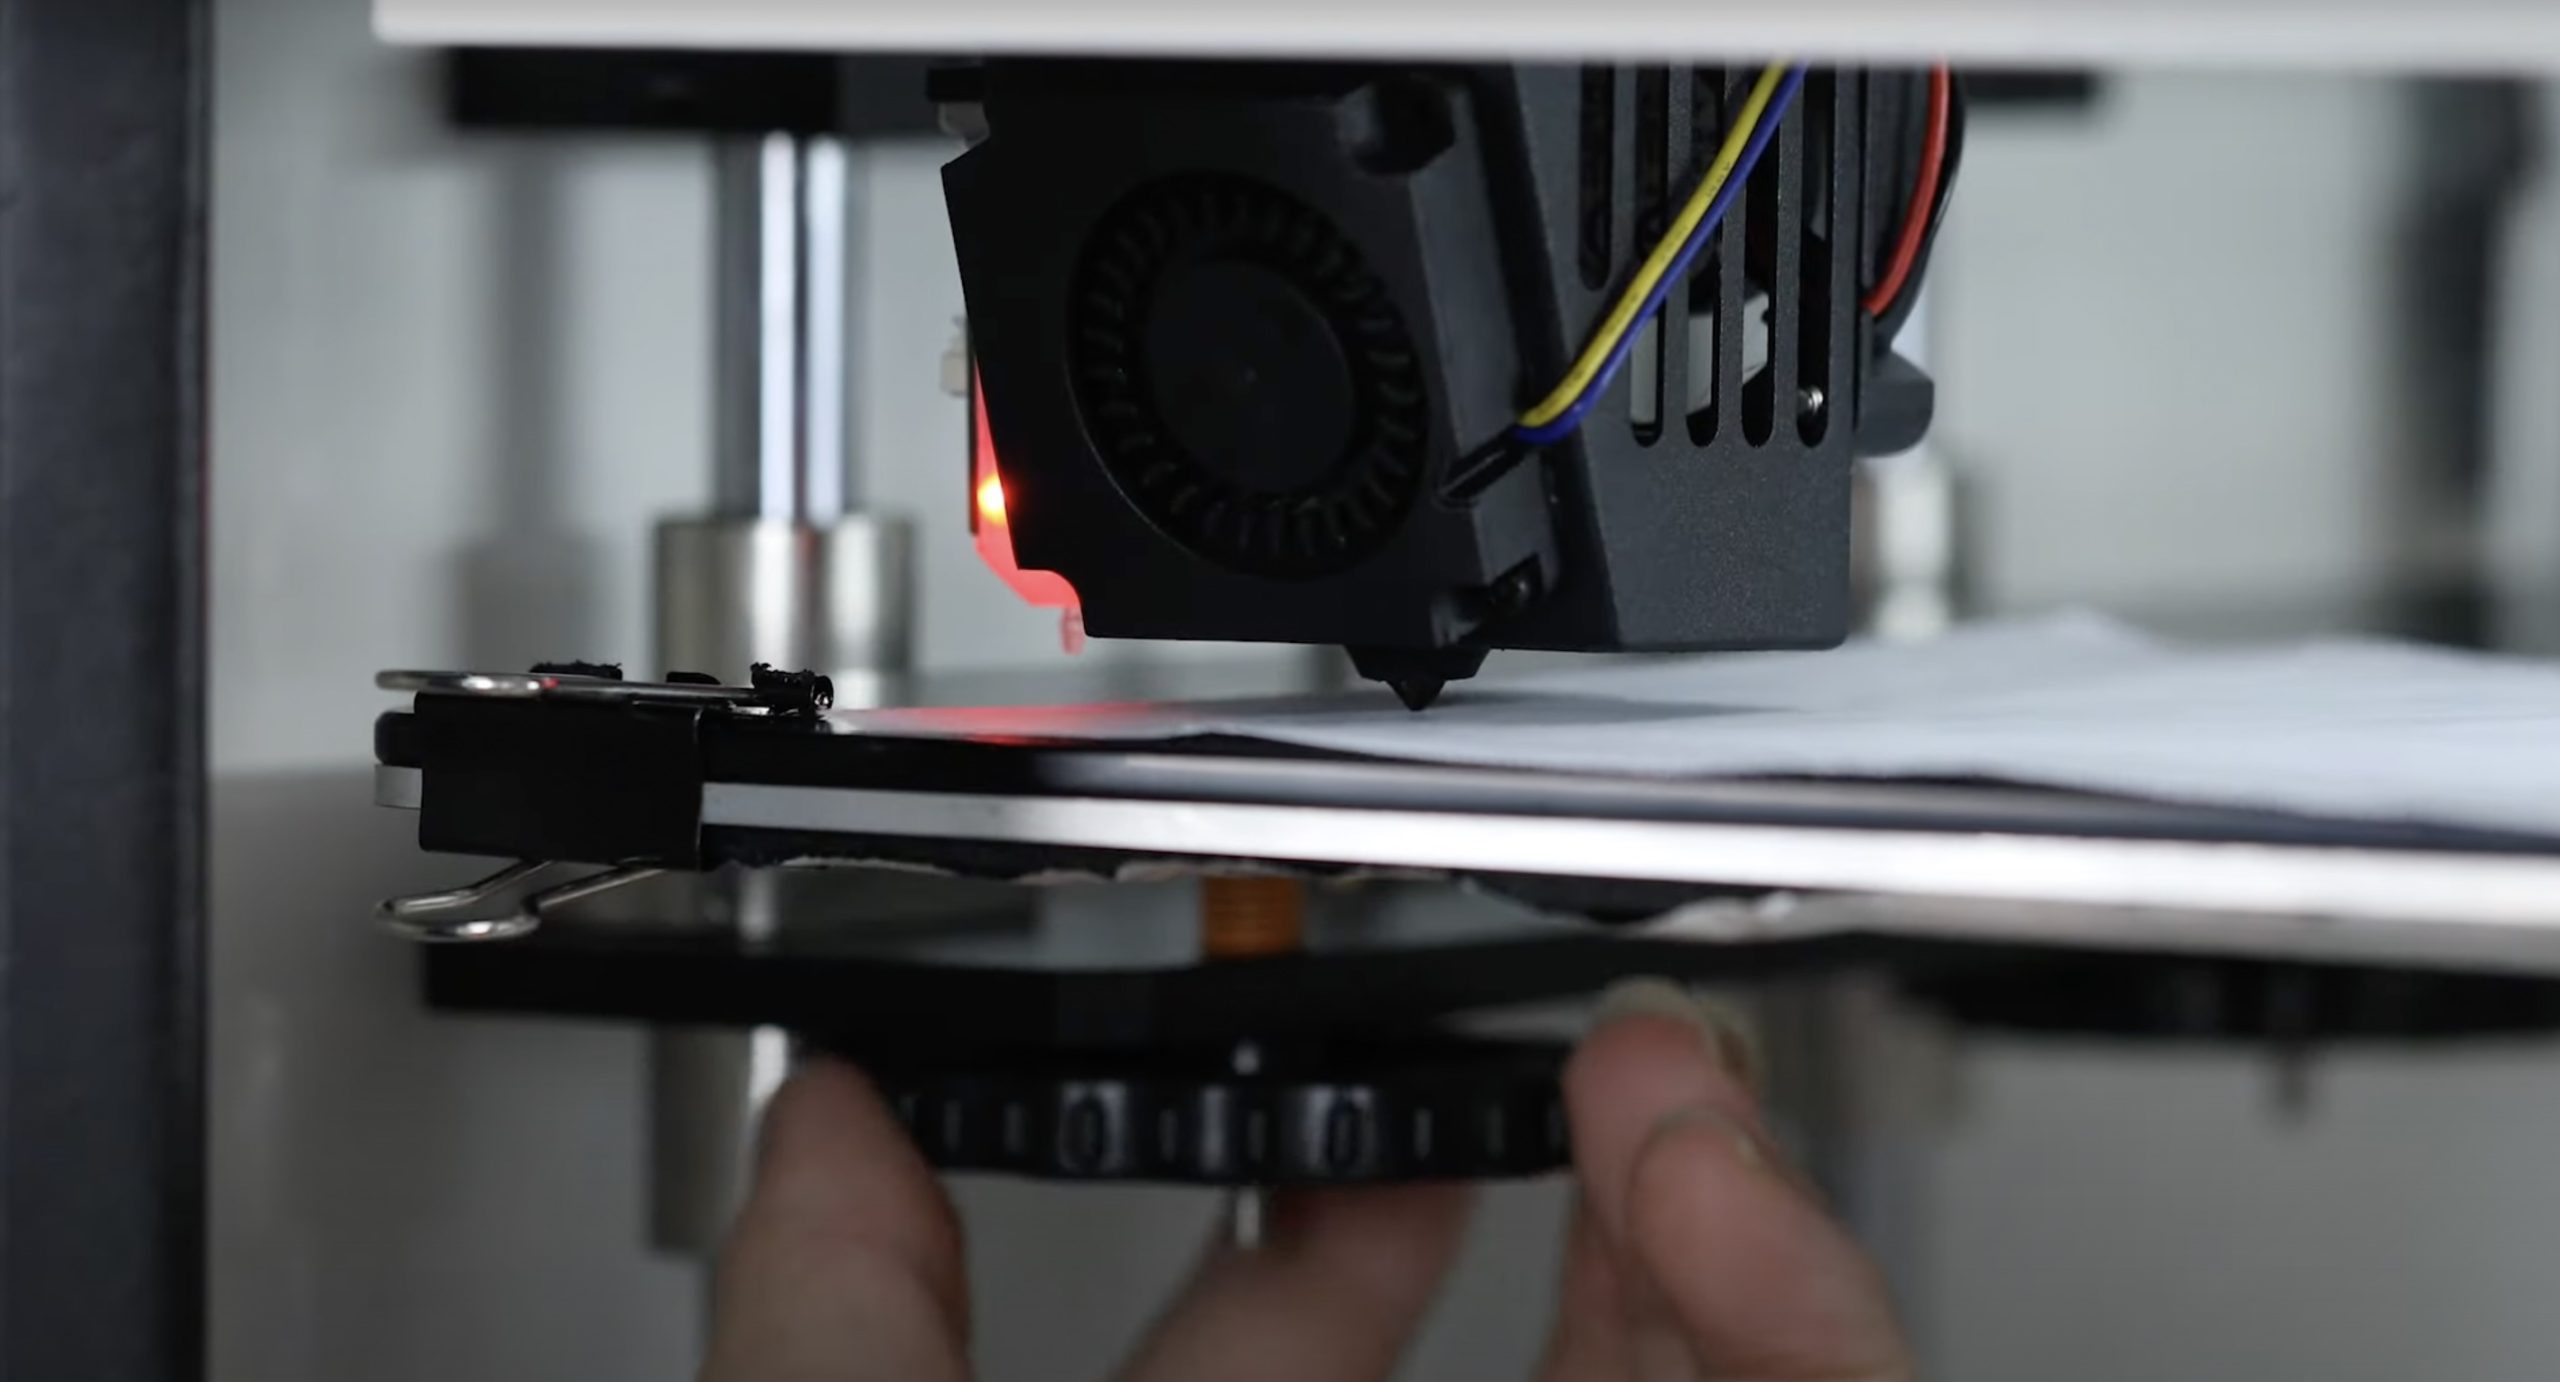
Calibrating with a paper
Retraction
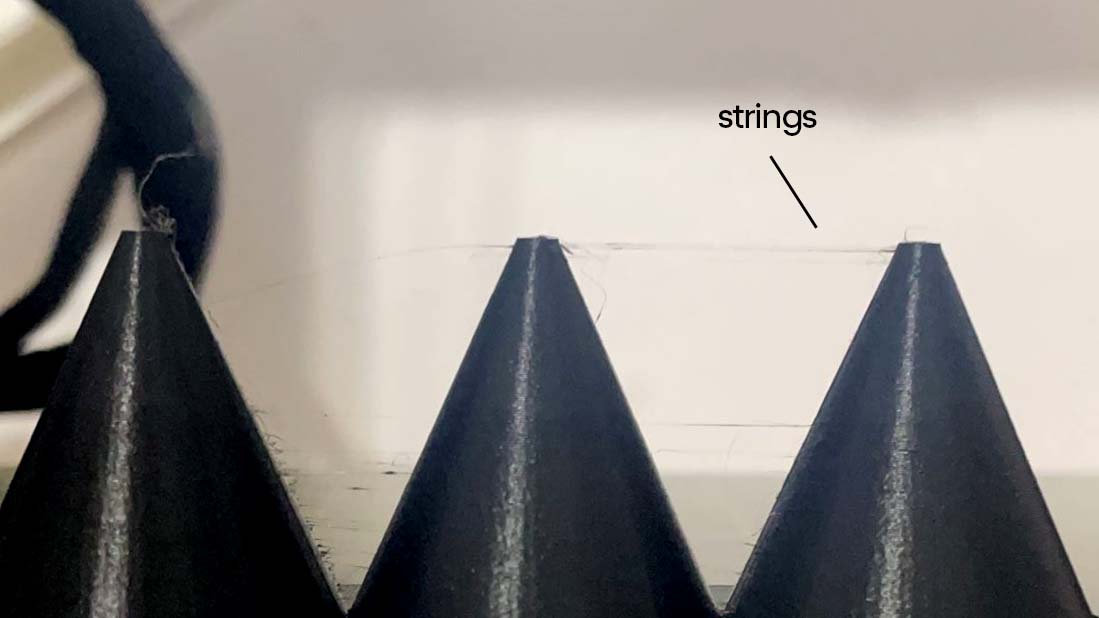
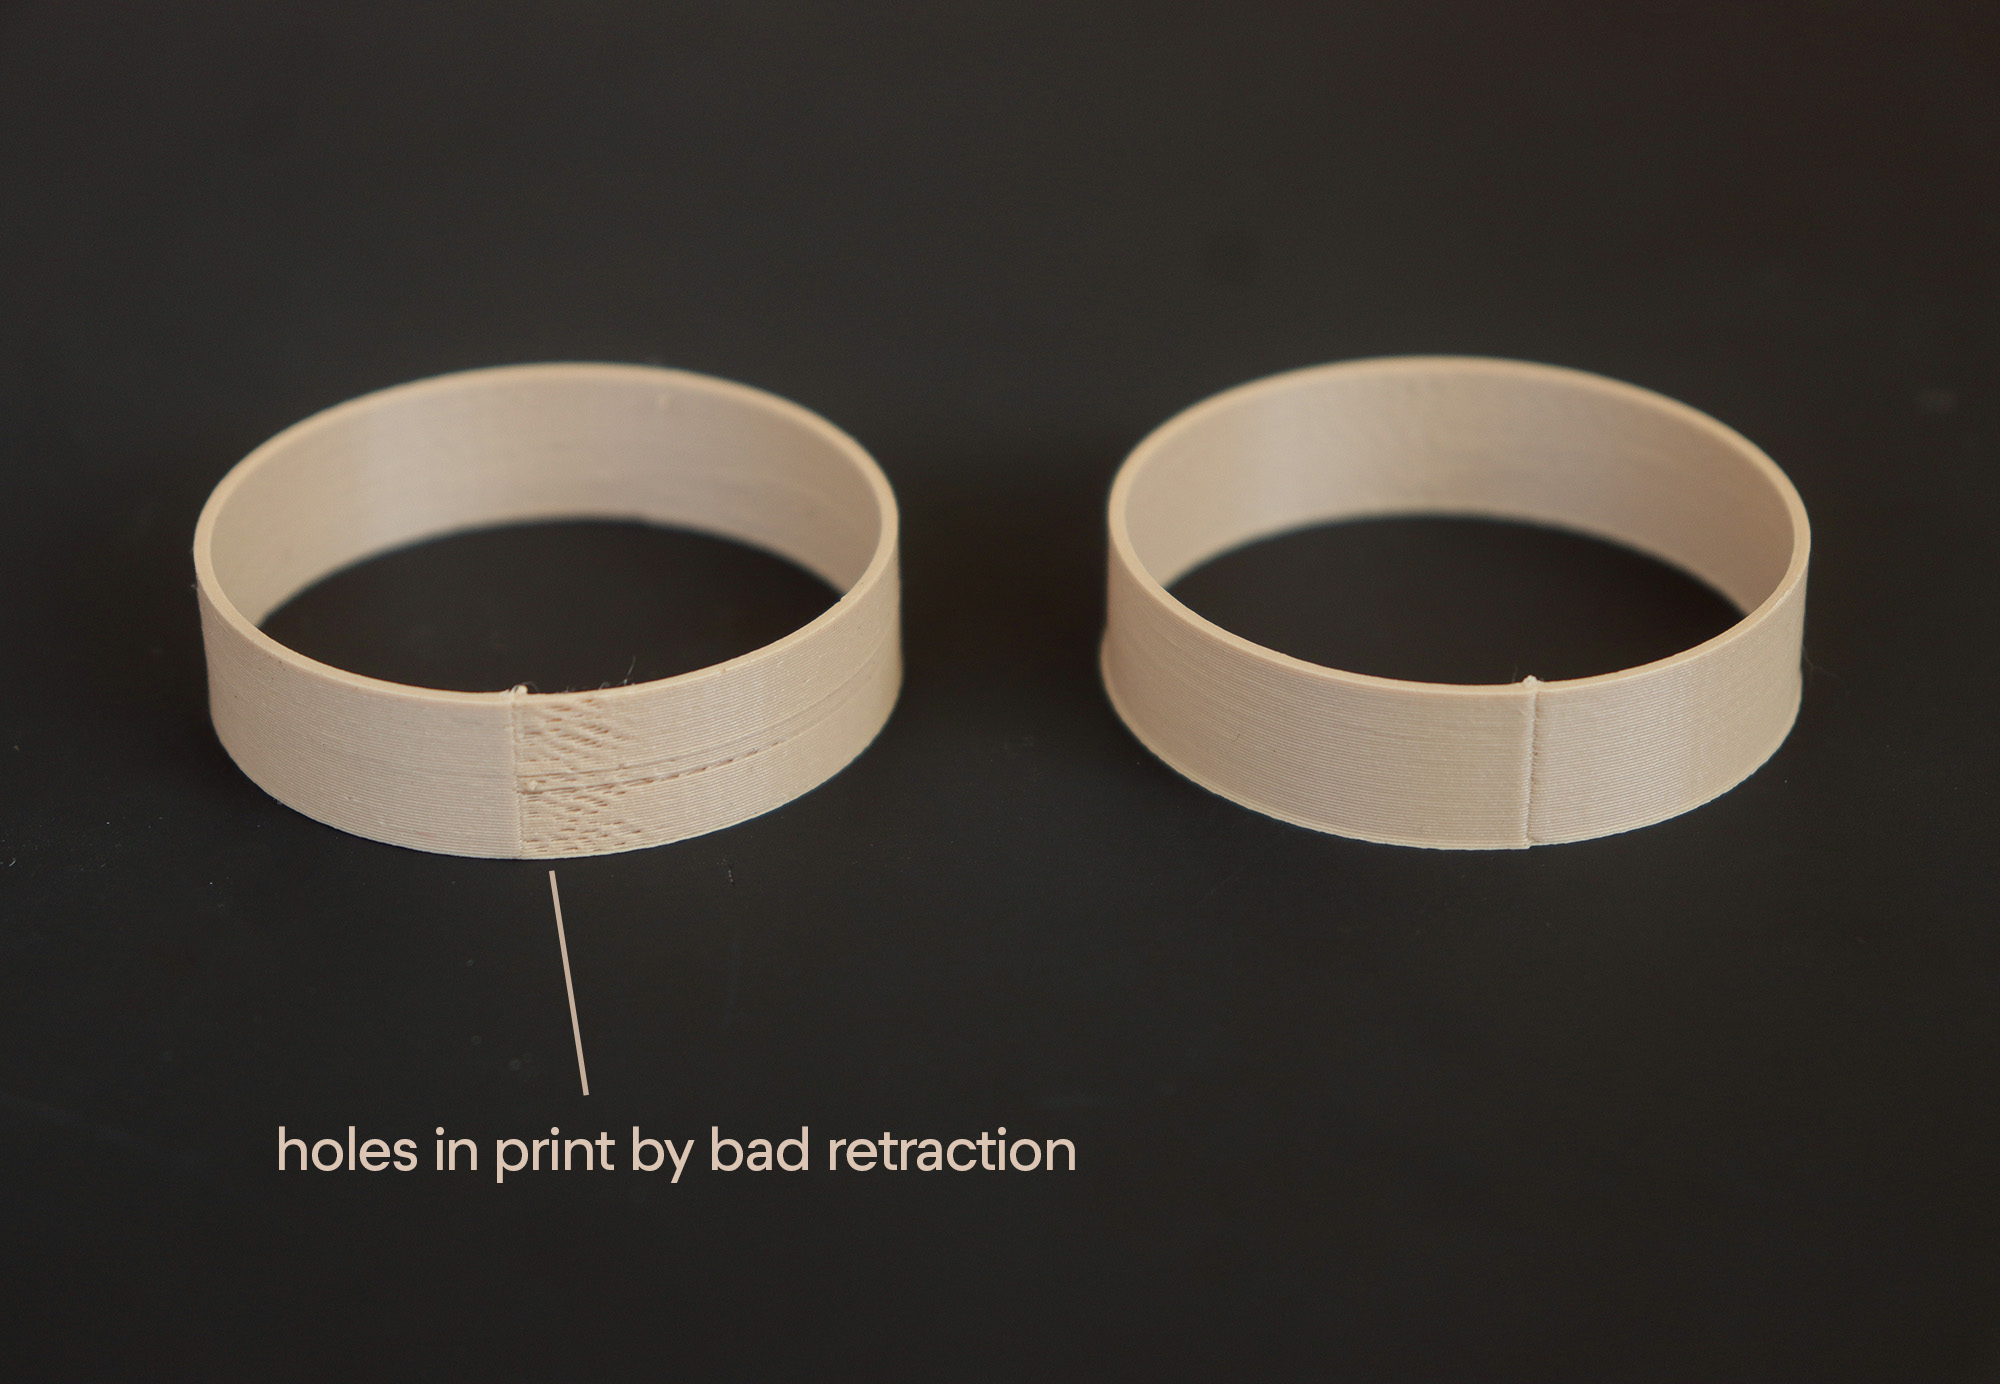
If you’re printing with a basic filament like regular pla, the basic retraction setting is usually correct. Nicer materials like modern pla, matte pla and specialty materials need to adjust the settings. What does retraction mean? Every time the printer needs to travel from one place to another, it has to pull the material back into the head and then push it out again. Otherwise it would leave a material along the way, called strings. What is even worse, especially if you need to print waterproof products, is to have too much retraction and it prints little material after each travel and you have holes in the print.
Retraction settings are different for all the printers, because there is a big difference if you have direct extruder or not. We recomend to read the manufacturer. We recommend going through the manufacturer’s recommendations and ideally also looking for people’s experiences. And doing a few tests is definitely the best. If your printer do strings, you should increase the retraction distance. And when you have some holes after the travel, increase Retraction Extra Prime Amount.
Retraction settings:
Distance – how much material goes back
Speed – how fast
Retraction Extra Prime Amount – how much material goes out after retraction
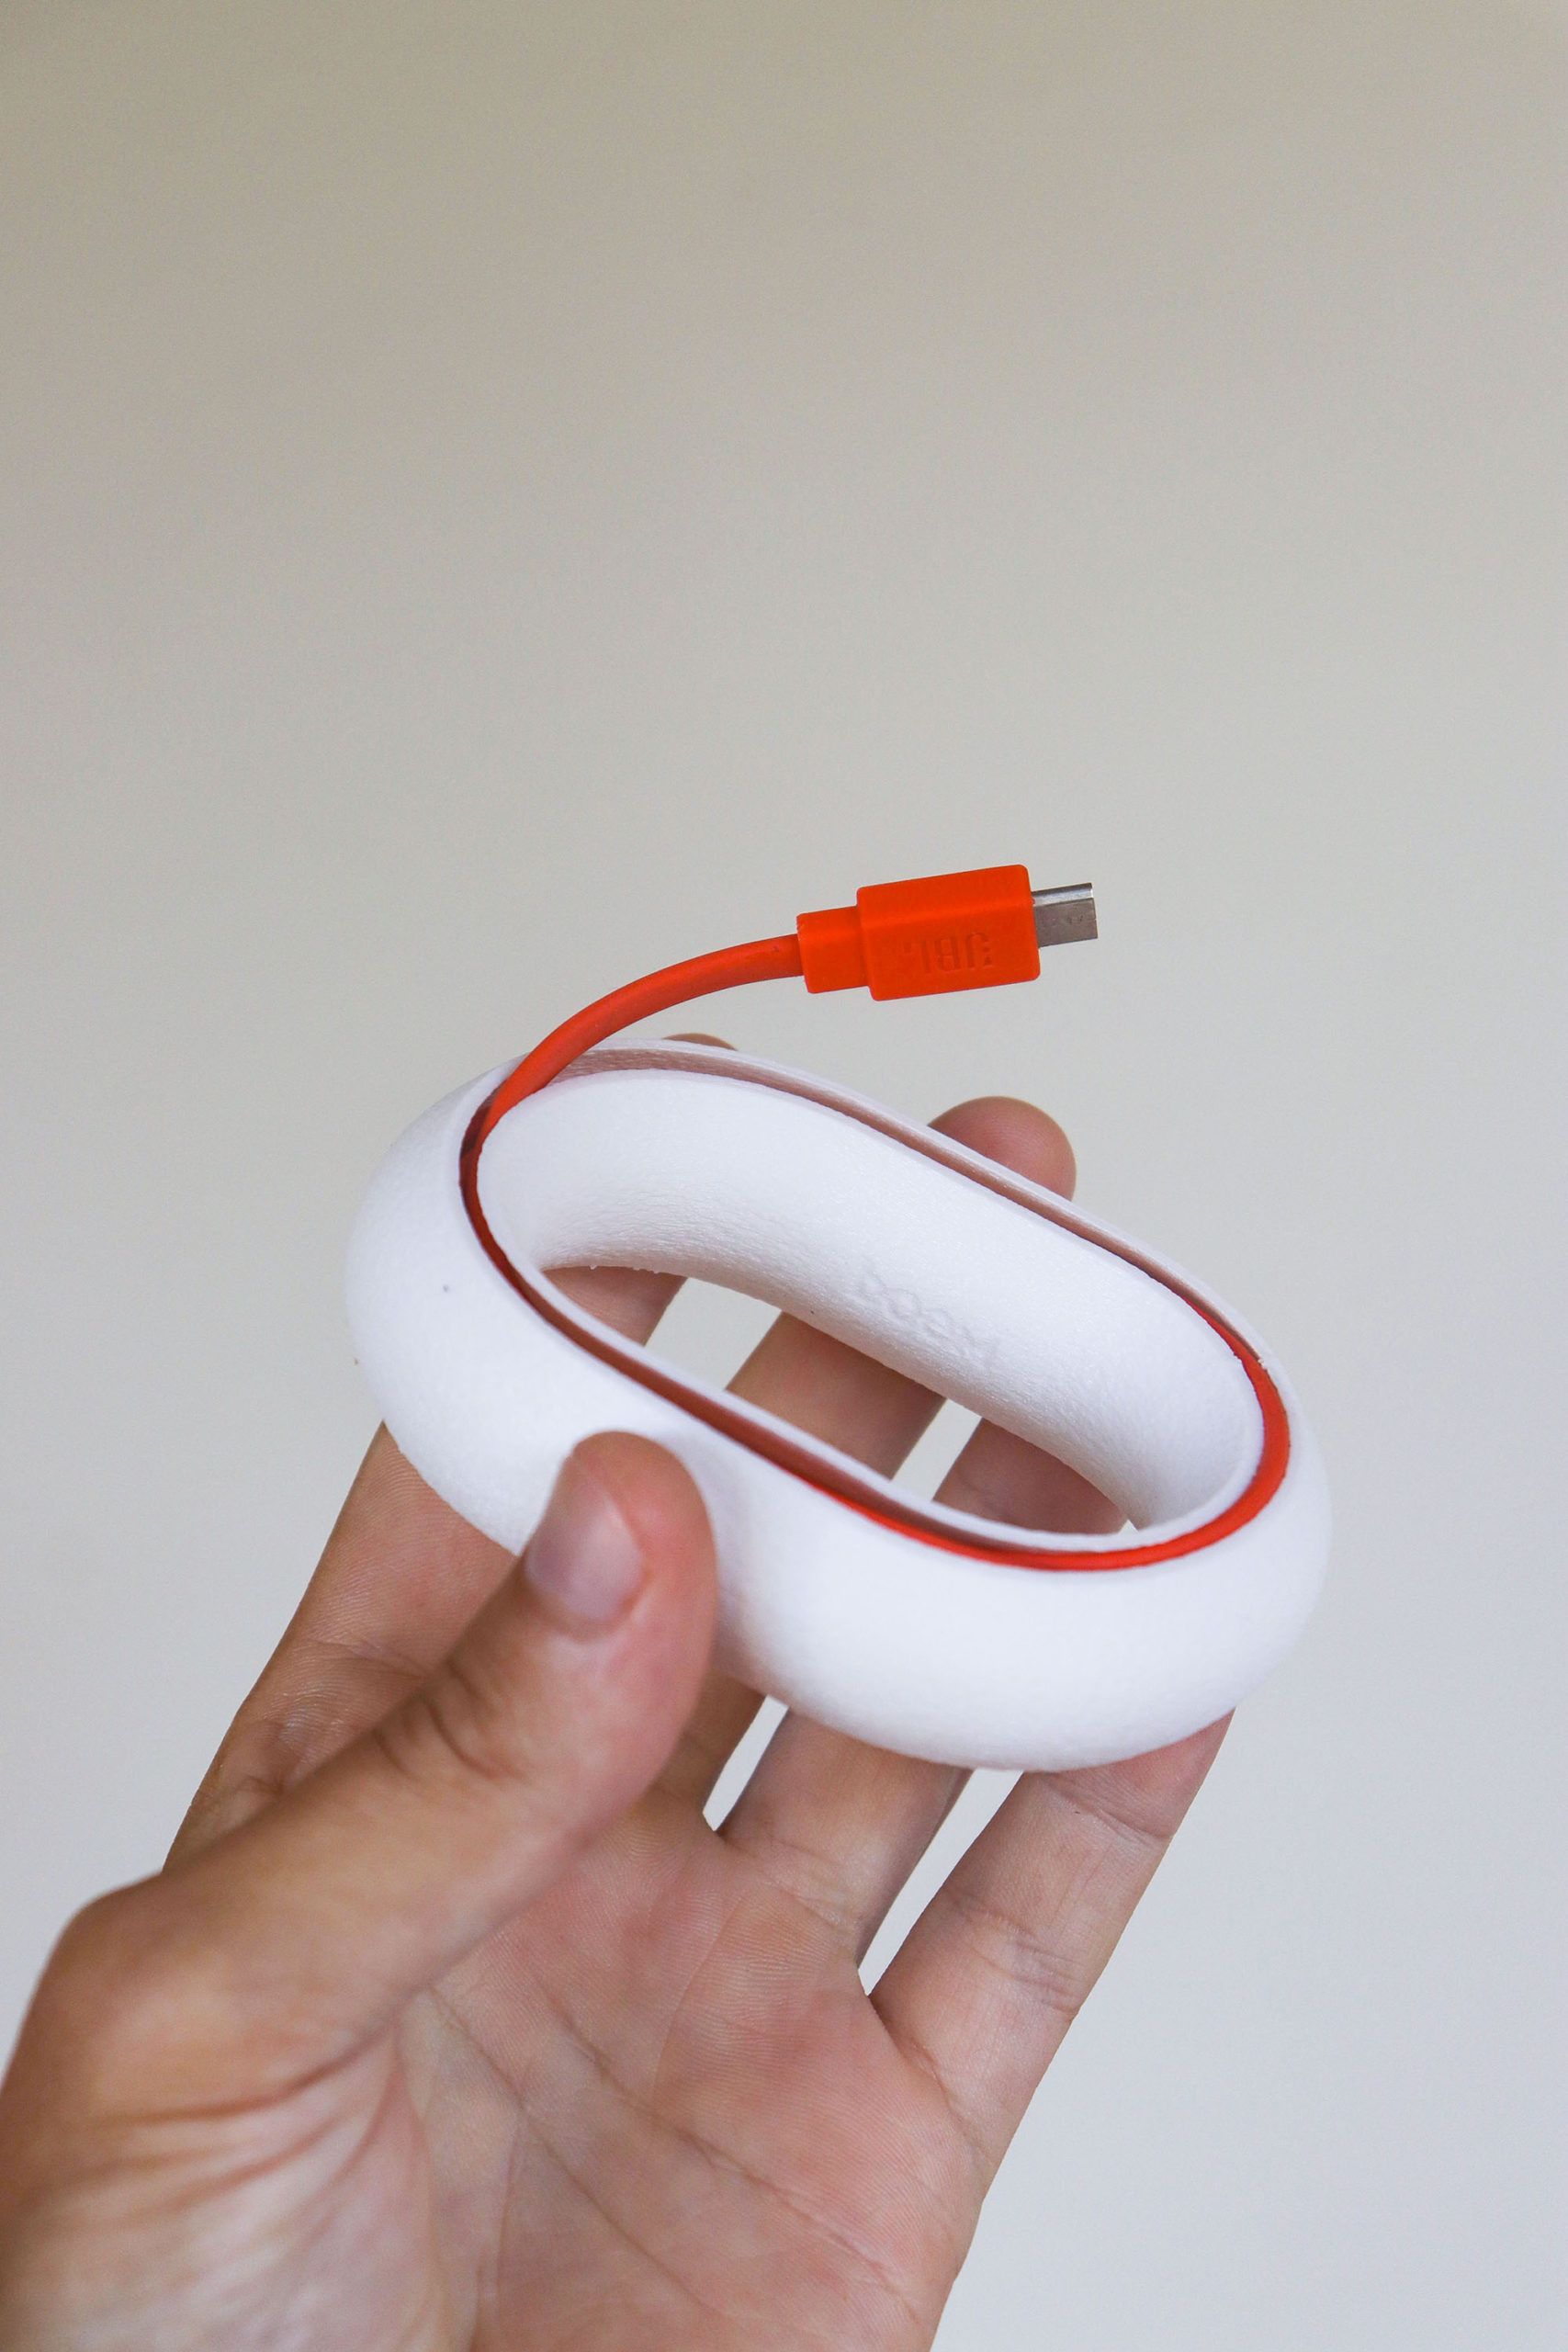
Adhesive Spray
We recommend to use adhesive spray on you bed to prevent warping and tearing your print. sometimes the print may come loose and fall off after a few hours of printing, which is very sad. We are always using 3DLAC spray and together with the right bed temperature we never had a problem.
Flexible Magnetic Powder Coated Sheet
Removable pads help you easily remove the print as they are flexible. It is a good idea to buy a mat with a textured surface, which will print a textured surface on the bottom of your print and the bottom will look much better.
Choosing a material
After buying a FFF 3D printer, you Today it is possible to choose from a really wide range of materials growing every year. You can buy eco friendly materials, biodegradable materials, recycled materials and a lot of special materials containing wood or metal. We list here only those we have used for our products, but you can use your creativity and use something special.
Materials for FFF printers are sold in spools called Filament. Usually you need filament in 1,75mm diameter and with 1kg of material you can print 30x our watering can.
Matt PLA
Unlike ordinary pla, it has a beautiful matte finish, which makes the prints really nice. The fine texture can also mask the layers, so there is no need to texture the surface so that the prints do not look ugly. For us, Matt White PLA is one of the best materials that can be finished with sandpaper to complete perfection, unlike colored materials, where you will always see traces of sandpaper. Be careful with outdoor use, direct sunlight have the power to distort the prints.
↑ 3D Jake Matt Black PLA
3D Jake Matt White PLA ↓
Wood
Wood filaments are definitely the most beautiful. However, it is necessary to keep in mind that they need at least a 0.5 mm nozzle, because they like to clog. And they also dissolve the oils a bit during printing, so it’s a good idea to clean the nozzle as you continue to print other materials as well.

PC-Carbon | Organic Carbon
This material offers excellent thermal properties, strength & stiffness, superior dimensional stability, and an amazing surface finish. Tiny carbon particles create a nice surface structure and a slightly metallic appearance. These materials have a higher temperature resistance and can therefore withstand direct sunlight and also the dishwasher.
TPU
TPU is a type of flexible and elastic 3D printing filament. Its rubber-like elasticity, resilience, and durability make it suitable for our Spacetravel collection. Because TPU settings are quite different than basic materials, we have a print settings explained here.
Tips:
When you measure the weight of the filament at the beginning, you can measure how much material you have left after the use.
Exporting model to your printer
To print a 3D model (.stl file ) you need to create a .gcode print file from it. This is done by using software called Slicer, which calculates printing paths according to the settings you want. The most common ones are Cura and PrusaSlicer, which we also use.
slicer
Thanks to this program, you can set the size, material, speed, print details, structure etc. Cura and PrusaSlicer are the two most used applications that have the preset for the most printers on the market.
download Cura | download PrusaSlicer
insert model
Inserting a model is simple using drag and drop or by import. There are important tools for moving the model, duplicating model, mirroring model, and scaling. This can be important for you with our scalable models. The best for the quality is to print only one object to reduce the travels and have as much clean paths as possible. But it is of course possible to fill your print bed and print a lot of products during night.
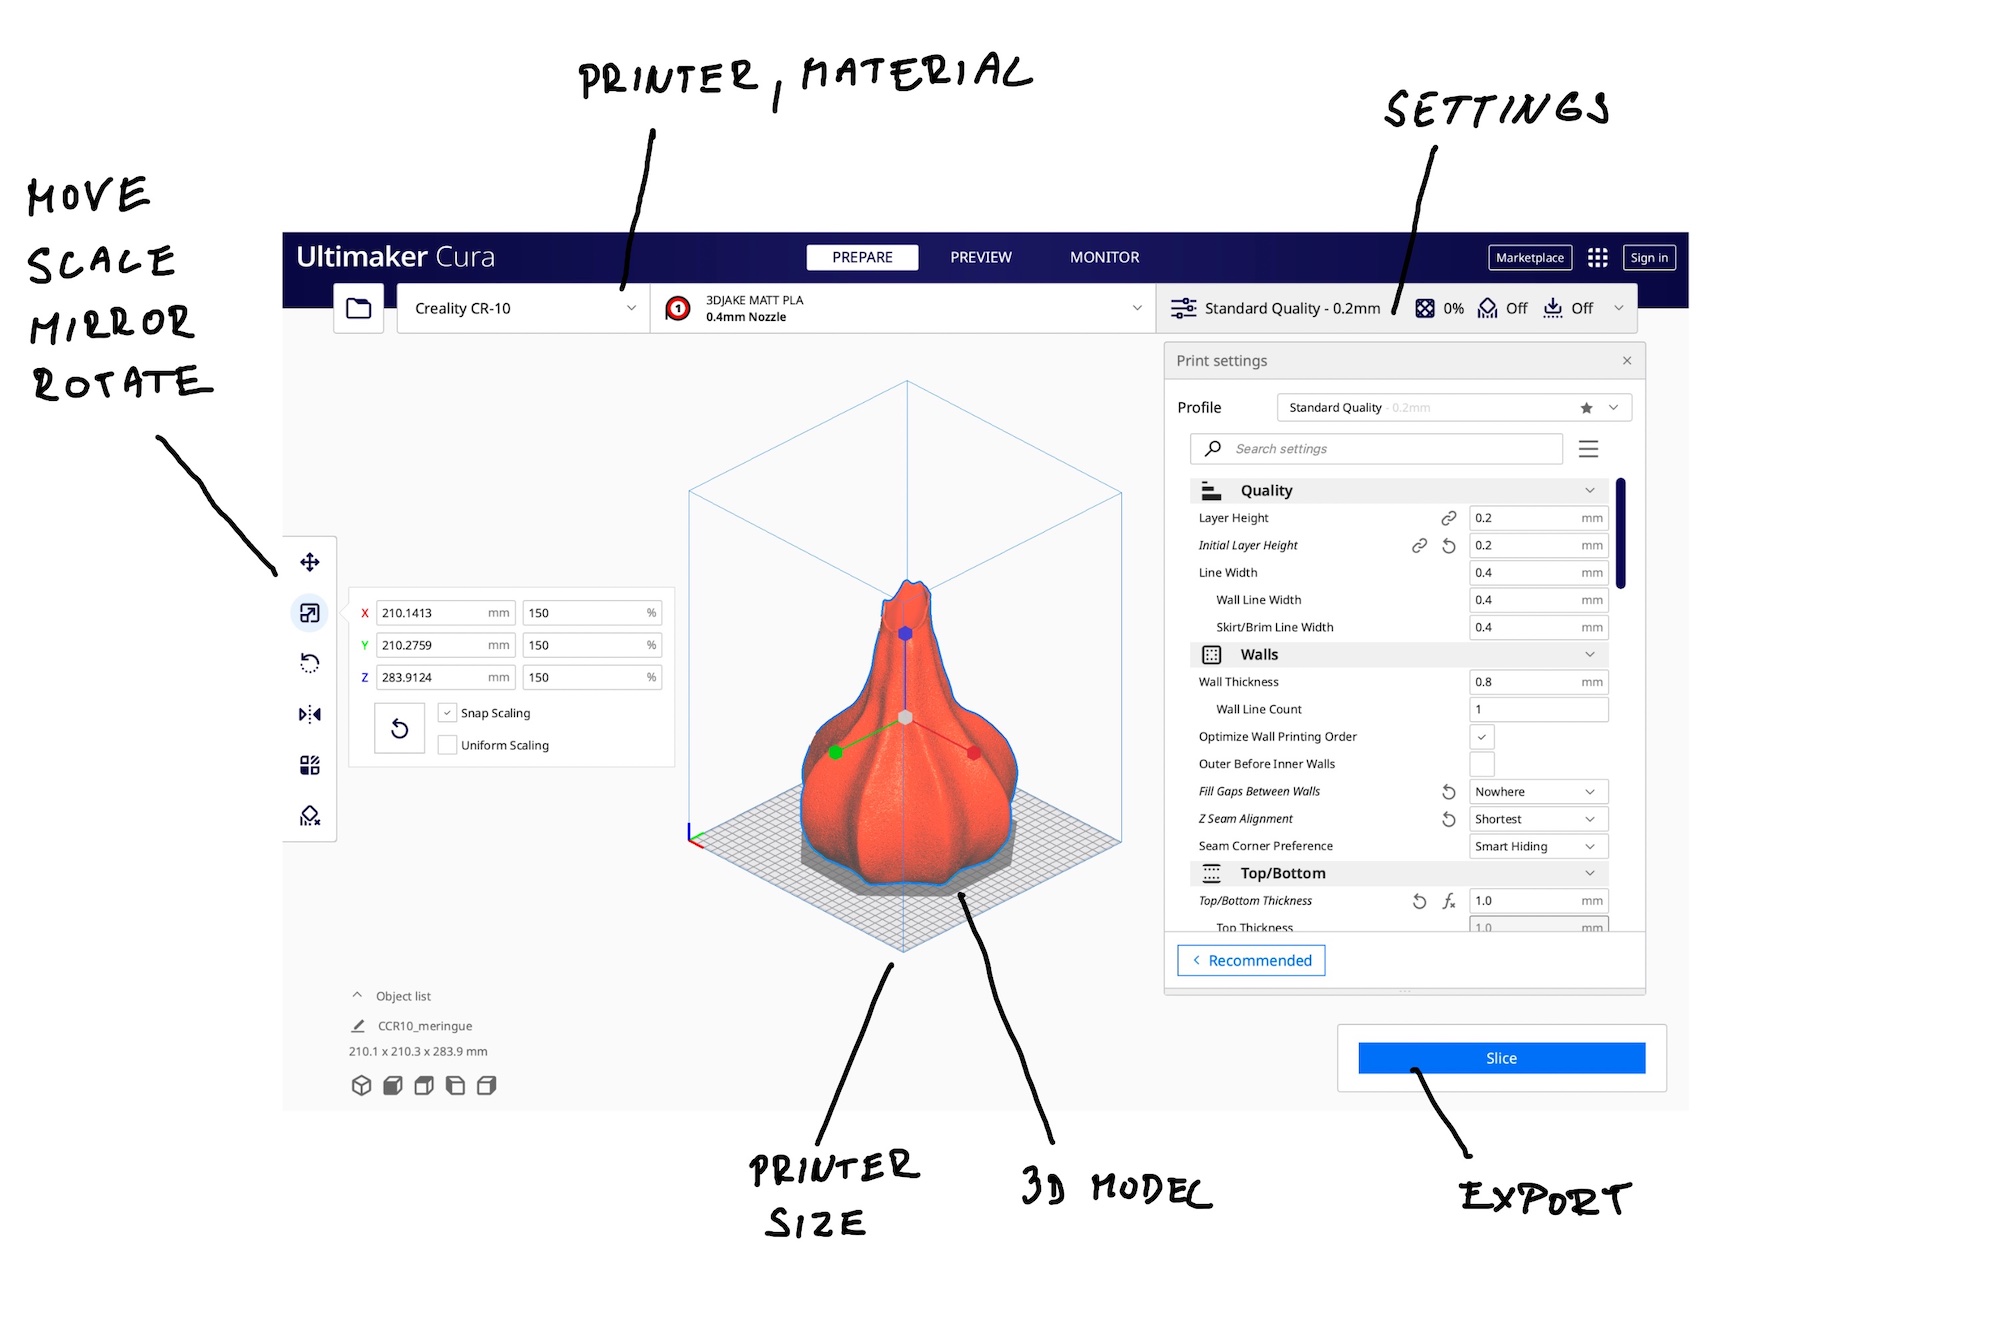
your material (filament) settings
For each material, you will find settings for print temperature, bed temperature, fan blowing, and print speed.
set the nozzle size
The most commonly used nozzle is 0.4 mm. This is an ideal choice for small and medium-sized printers for high-quality detailed printing together with the most materials. If you want to print larger objects and also speed up your prints, it is a good idea to choose a larger nozzle. When you use a 0.8 nozzle instead of a 0.4, the printer prints half the lines = 2x faster.
Our simple reccomendation is:
0.4 nozzle for accessories
0.8 nozzle for furniture
insert our recomended settings
We attach recommended settings together with our models. And here we will describe the most important parameters we use. The most important thing is to learn to control these 6 parameters and understand how they work. And with some experience, you can set those settings to your needs:
Line width & height
Perimeters
Infill
Top & Bottom Layers
Speed
line width
Line width equals the nozzle size. As we wrote above in nozzle size, we use
0.4 for accessories and decorations
0.8 for furniture and alternative materials like wood
line height
This setting will affect the height of the individual layers. The lower the value, the finer and more detailed the print will be and also the longer will be the printing time.
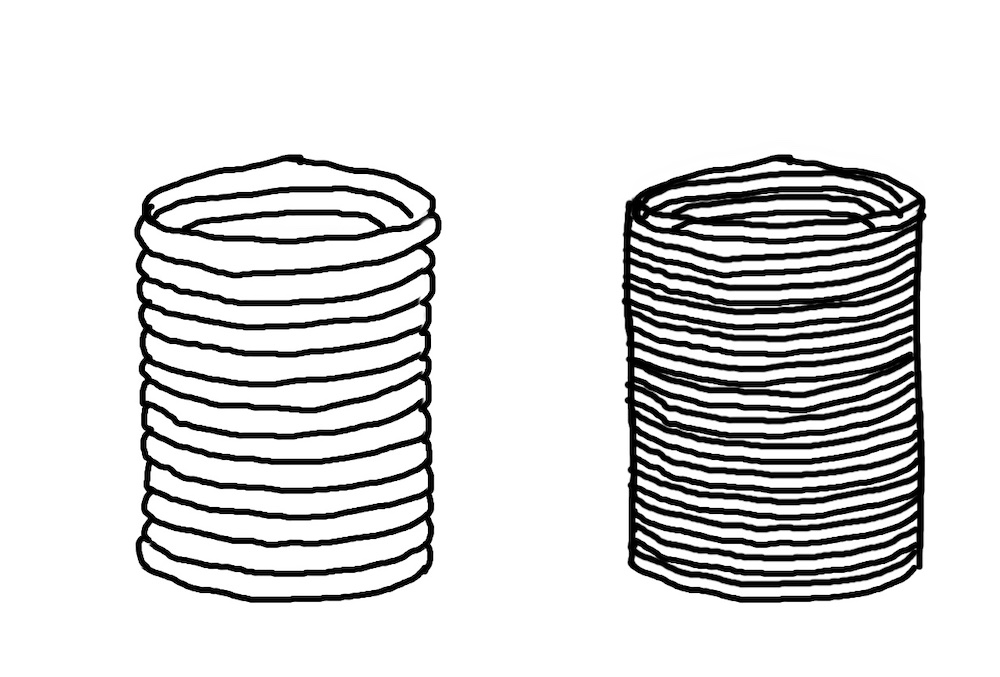
0.1 – small parts and perfect printing
0.16 – for detailed and waterproof printing
0.2 – normal quality
0.3 – larger objects
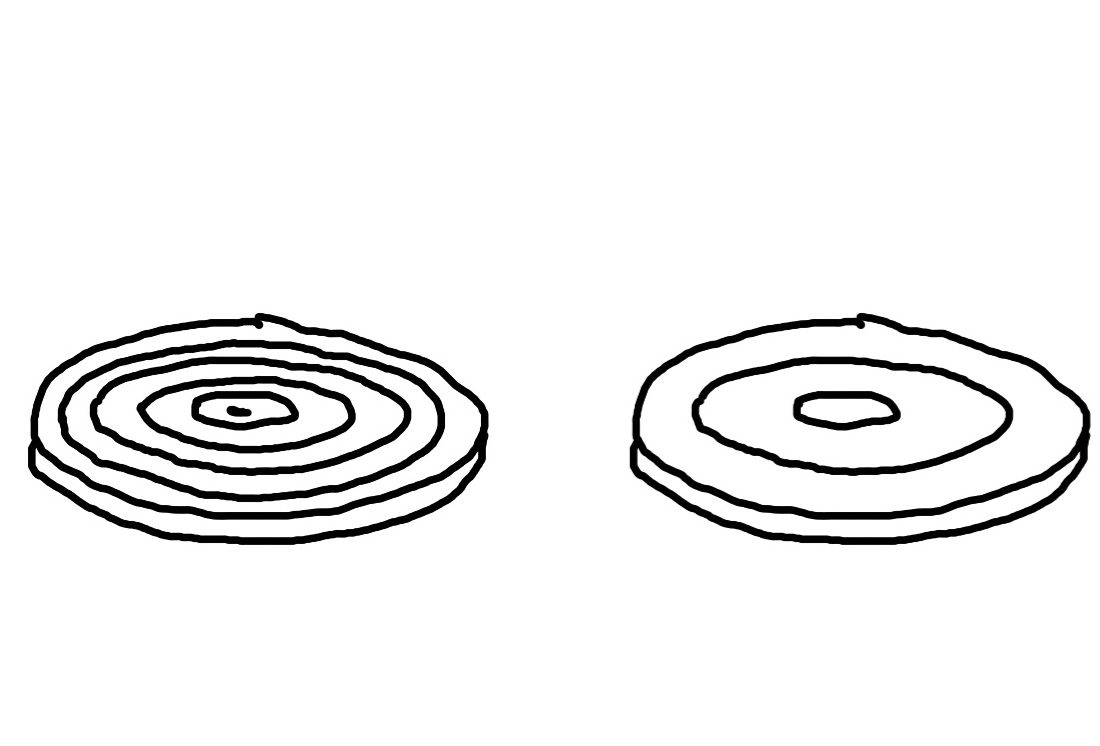
perimeters / wall line count
You can always find this value in our recommendations, as it affects the strength of the print. This value indicates how many lines next to each other will create a wall.
2 wall lines– usual
3 wall lines – firmer print
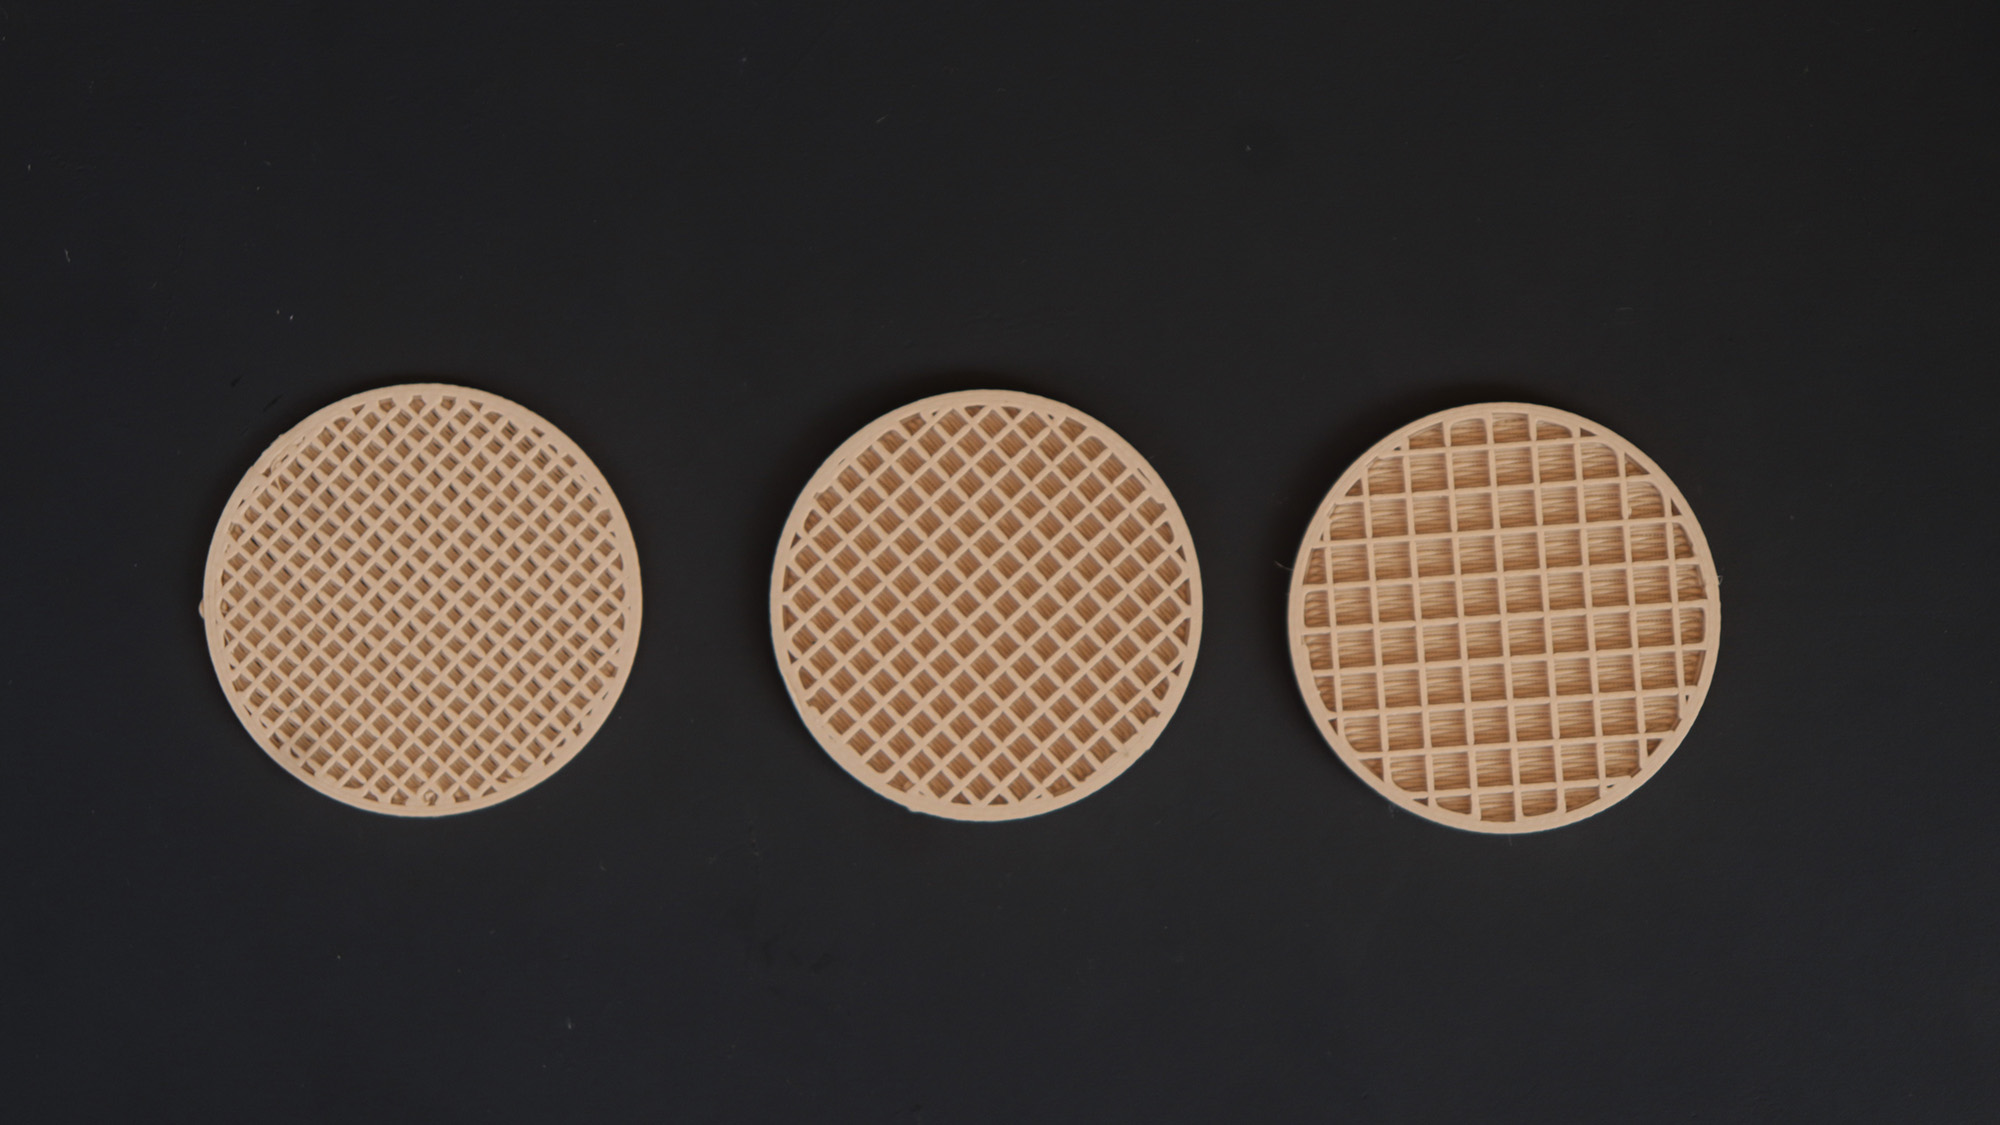
Infill
We have designed many of our products so that only the perimeters are needed and with no extra infill material. The infill creates a grid inside the object to create a firmer print. 3D prints are not printed 100% filled because it would be an unnecessary waste of material and time. The higher the filling, the stronger the print, together with the more material needed and the longer time. We use it mostly for the furniture, where it is good to use and you can decide if you want to save material or if you need a more durable product.
0% – for products where there is no need
10% – low fill
25% – ordinary filling
50% – solid print
More than 50% – madness
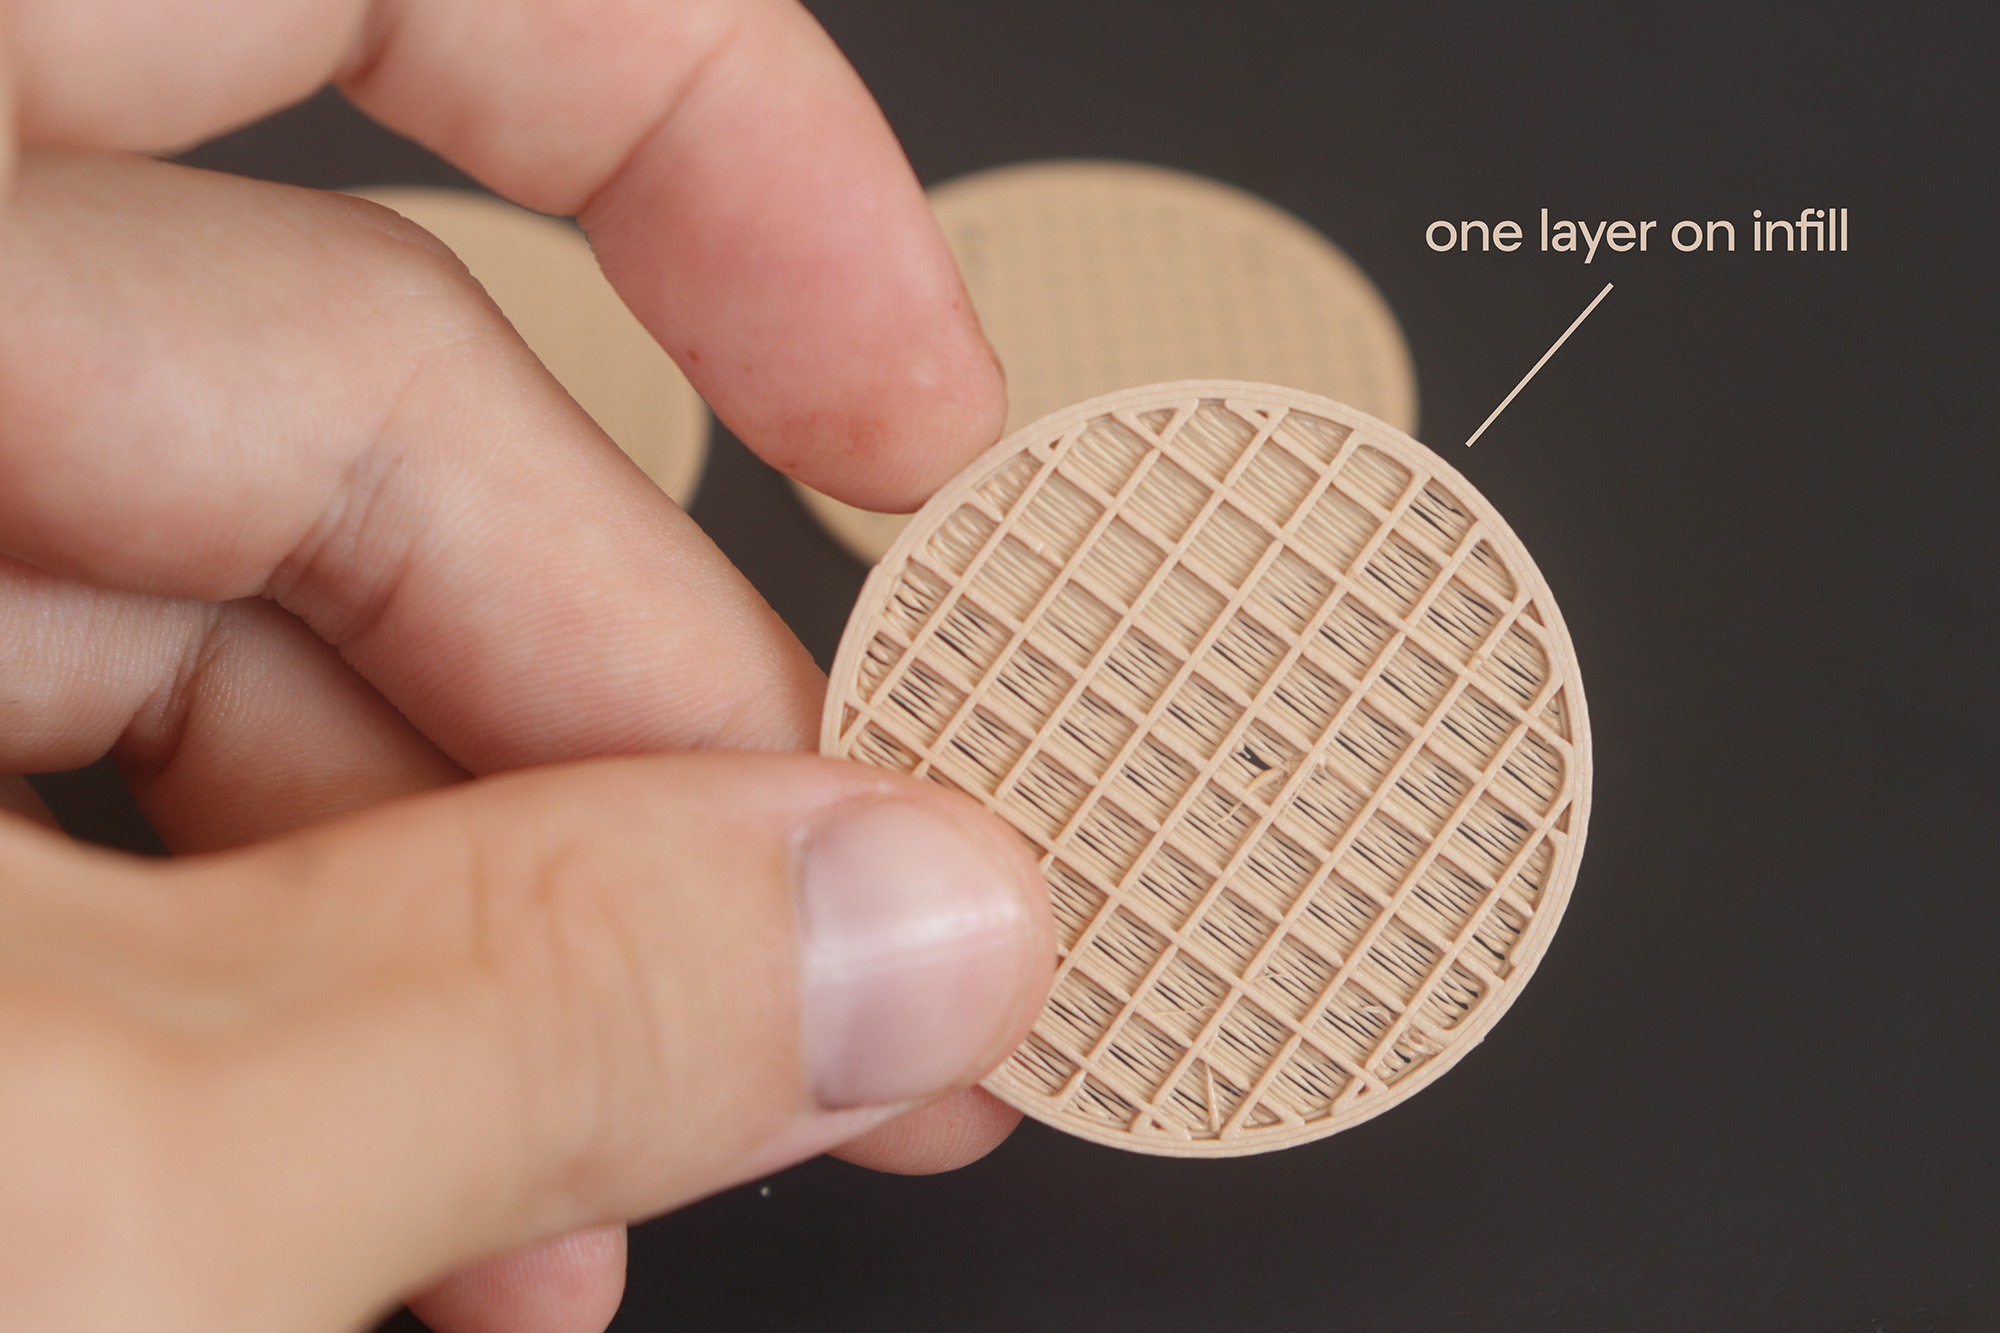
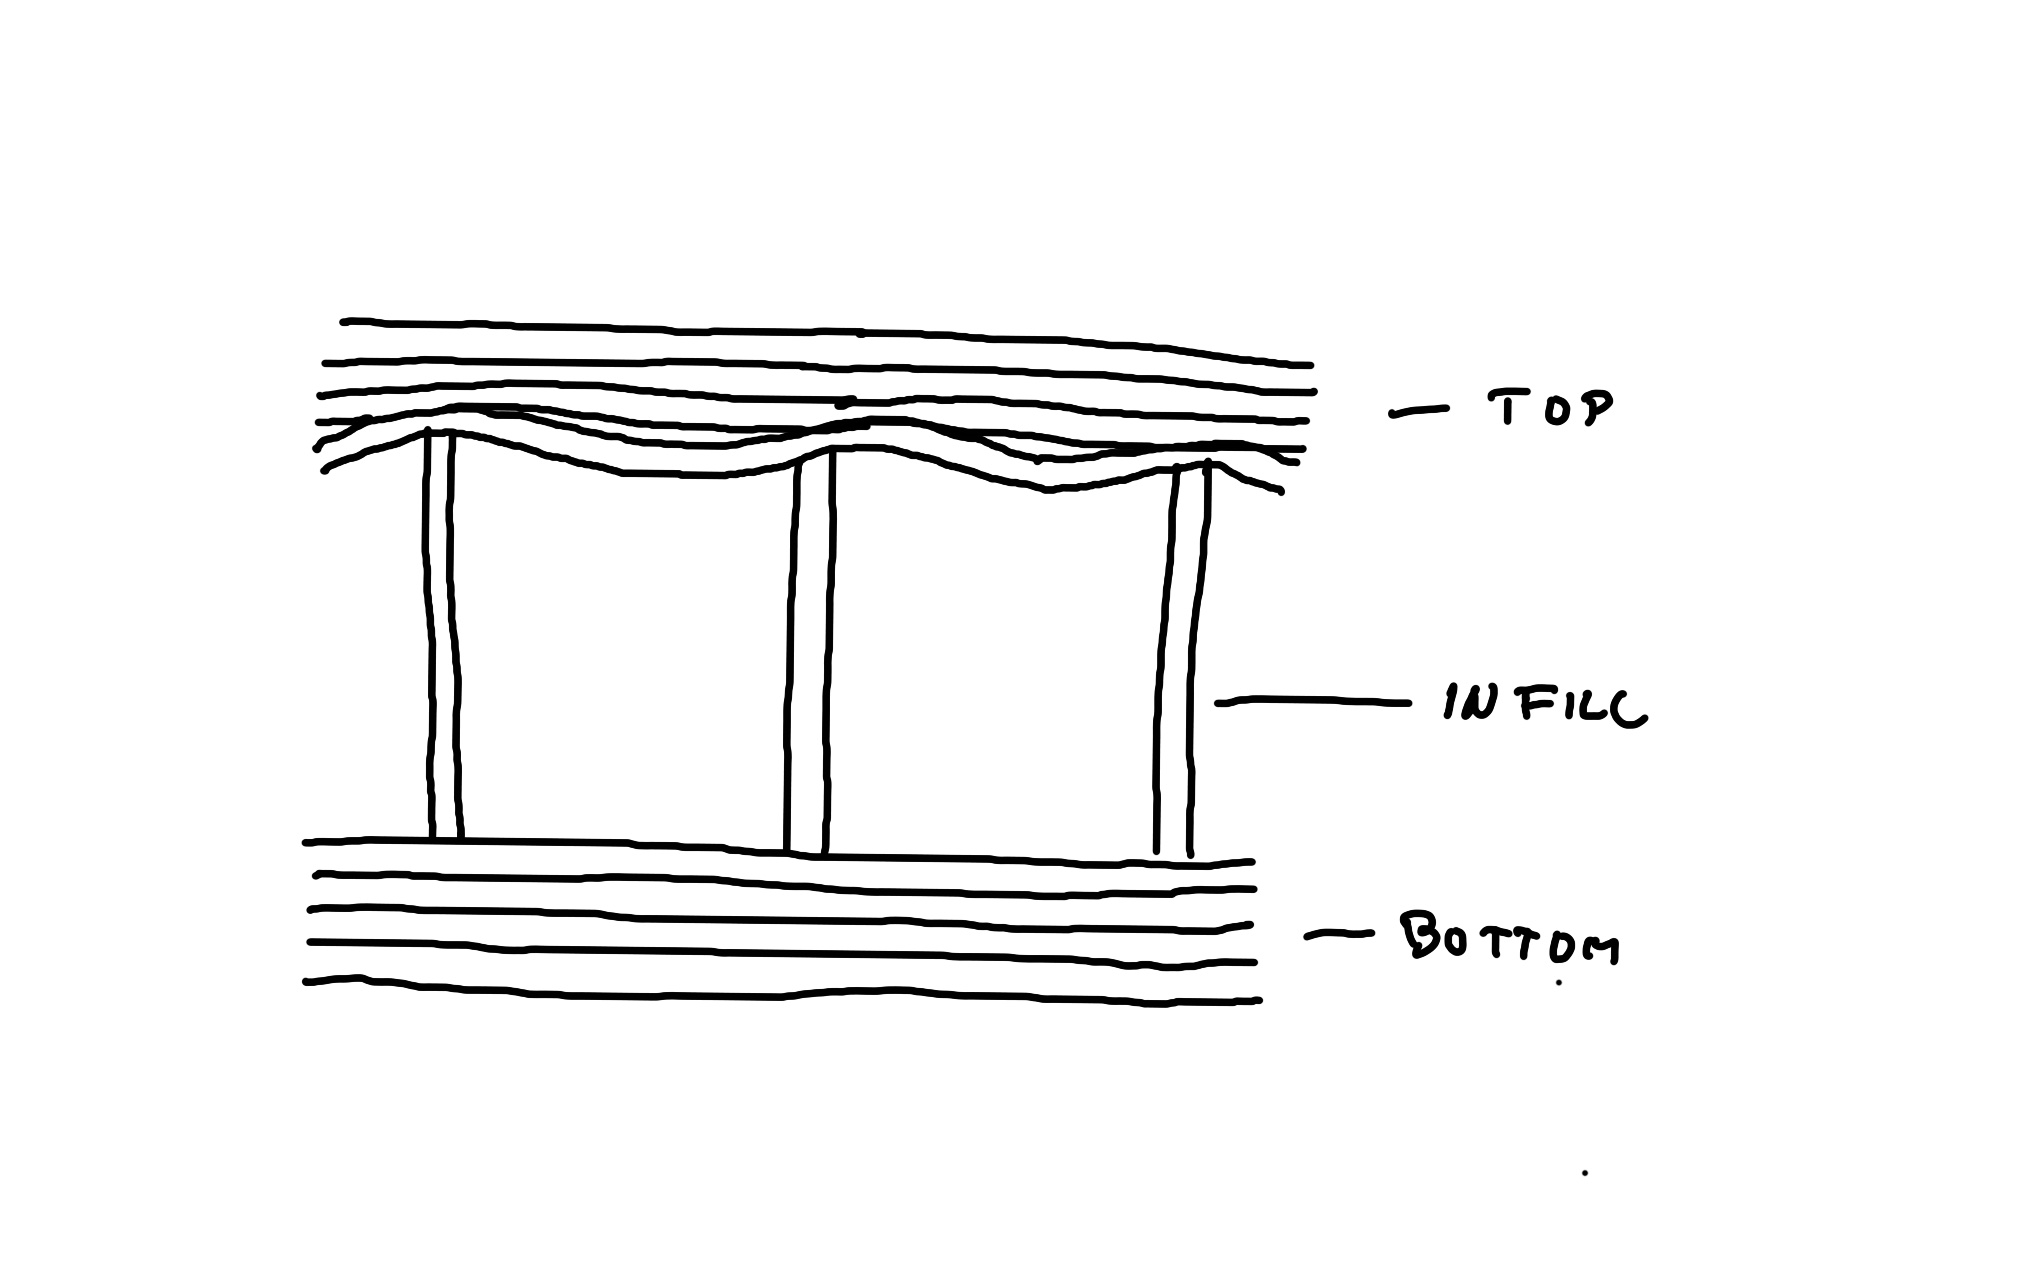
top & bottom Layers
You will also find this value for most of our products. This is related to the recommended layer height, and if you change this value, you must check and recalculate the number of top and bottom layers so that you don’t get a hole between them. It is very important products like watering can, where it is necessary to have enough layers that form the bottom, and also for products that use infill.
You usually need at least 4 top layers to cover the infill (the first layer will be falling and the next 3 will create a smooth top surface). And you also need at least 4 bottom layers to have a strong enough bottom under the infill.
speed
We cannot directly recommend the print speed as it relates to the printer design and the material you use. Usually you can use those settings except some special materials such as flexible filaments that you need to print slowly.
25mm/s – quality print, waterproof print
50mm/s – 70m/s – ordinary printing
100mm/s and more – printers with a stronger construction
Fuzzy skin
You can use fuzzy skin setting to distort the print path and hide the print layers. By default, the preset dimensions are relatively large in relation to the height of the layers for a fantastic grainy textured effect. By adjusting the setting to a finer density, you’ll achieve a nicely fine-grained surface texture.
This finer texture is helpful when using classic semi-gloss materials such as PLA, ABS, or PET-G, as well as with elastic materials. You will get a nice matte-grained surface which can help to mask any imperfections in the slicing software or your printer. It takes a bit longer to print, but we think the result is most definitely worth it.

Fuzzy Skin Thickness: 0.12 mm
Fuzzy Skin Density: 8.0
Layer Height: 0.2 mmm


Watertight 3D Prints

1 Go Slow
Pro tip: do not print on high speeds. Like basically ever, prints are always more accurate when printing on slower speeds. The main goal is to make the wall as dense as possible. So if your printer isn’t extremely heavy to provide the required stability, the vibrations that almost all printers produce at higher speeds will not allow for a watertight result.
2 Highest Temperature
To ensure a proper bond between the layers, print out your favorite design at the filament’s highest temperature. You can even increase it by 5C as the layers can melt together even easier.

3 Low Layer Height
When using the most common 0.4 nozzle, it’s best to print with a 0.15 mm layer height, or even go down to 0.05 mm. In our experience, thin layers adhere far better than thicker layers.

4 Forget the infill
Always print all the layers of the bottom without using infill without risk of gaps. Use a classic linear pattern that overlaps the individual layers.
5 Over-extrude
Increase the Flow (Cura) or Extrusion Multiplier (PrusaSlicer) to 105-110% to ensure there are no gaps between the perimeters and layers. This won’t change the look of the design, but will gain waterproof qualities.
Flexible Material – TPU
TPU is an easy filament to print, but it is important to set up printing correctly for its properties.
1 Go Slow
Pro tip: do not print on high speeds. TPU typically prints best at slower speeds. (15mm/s – 35mm/s)
2 Highest Temperature
To ensure a proper bond between the layers, print out at the filament’s highest temperature. Printing with higher temperatures will allow the filament to melt faster and to flow easier from a nozzle.
3 Retraction
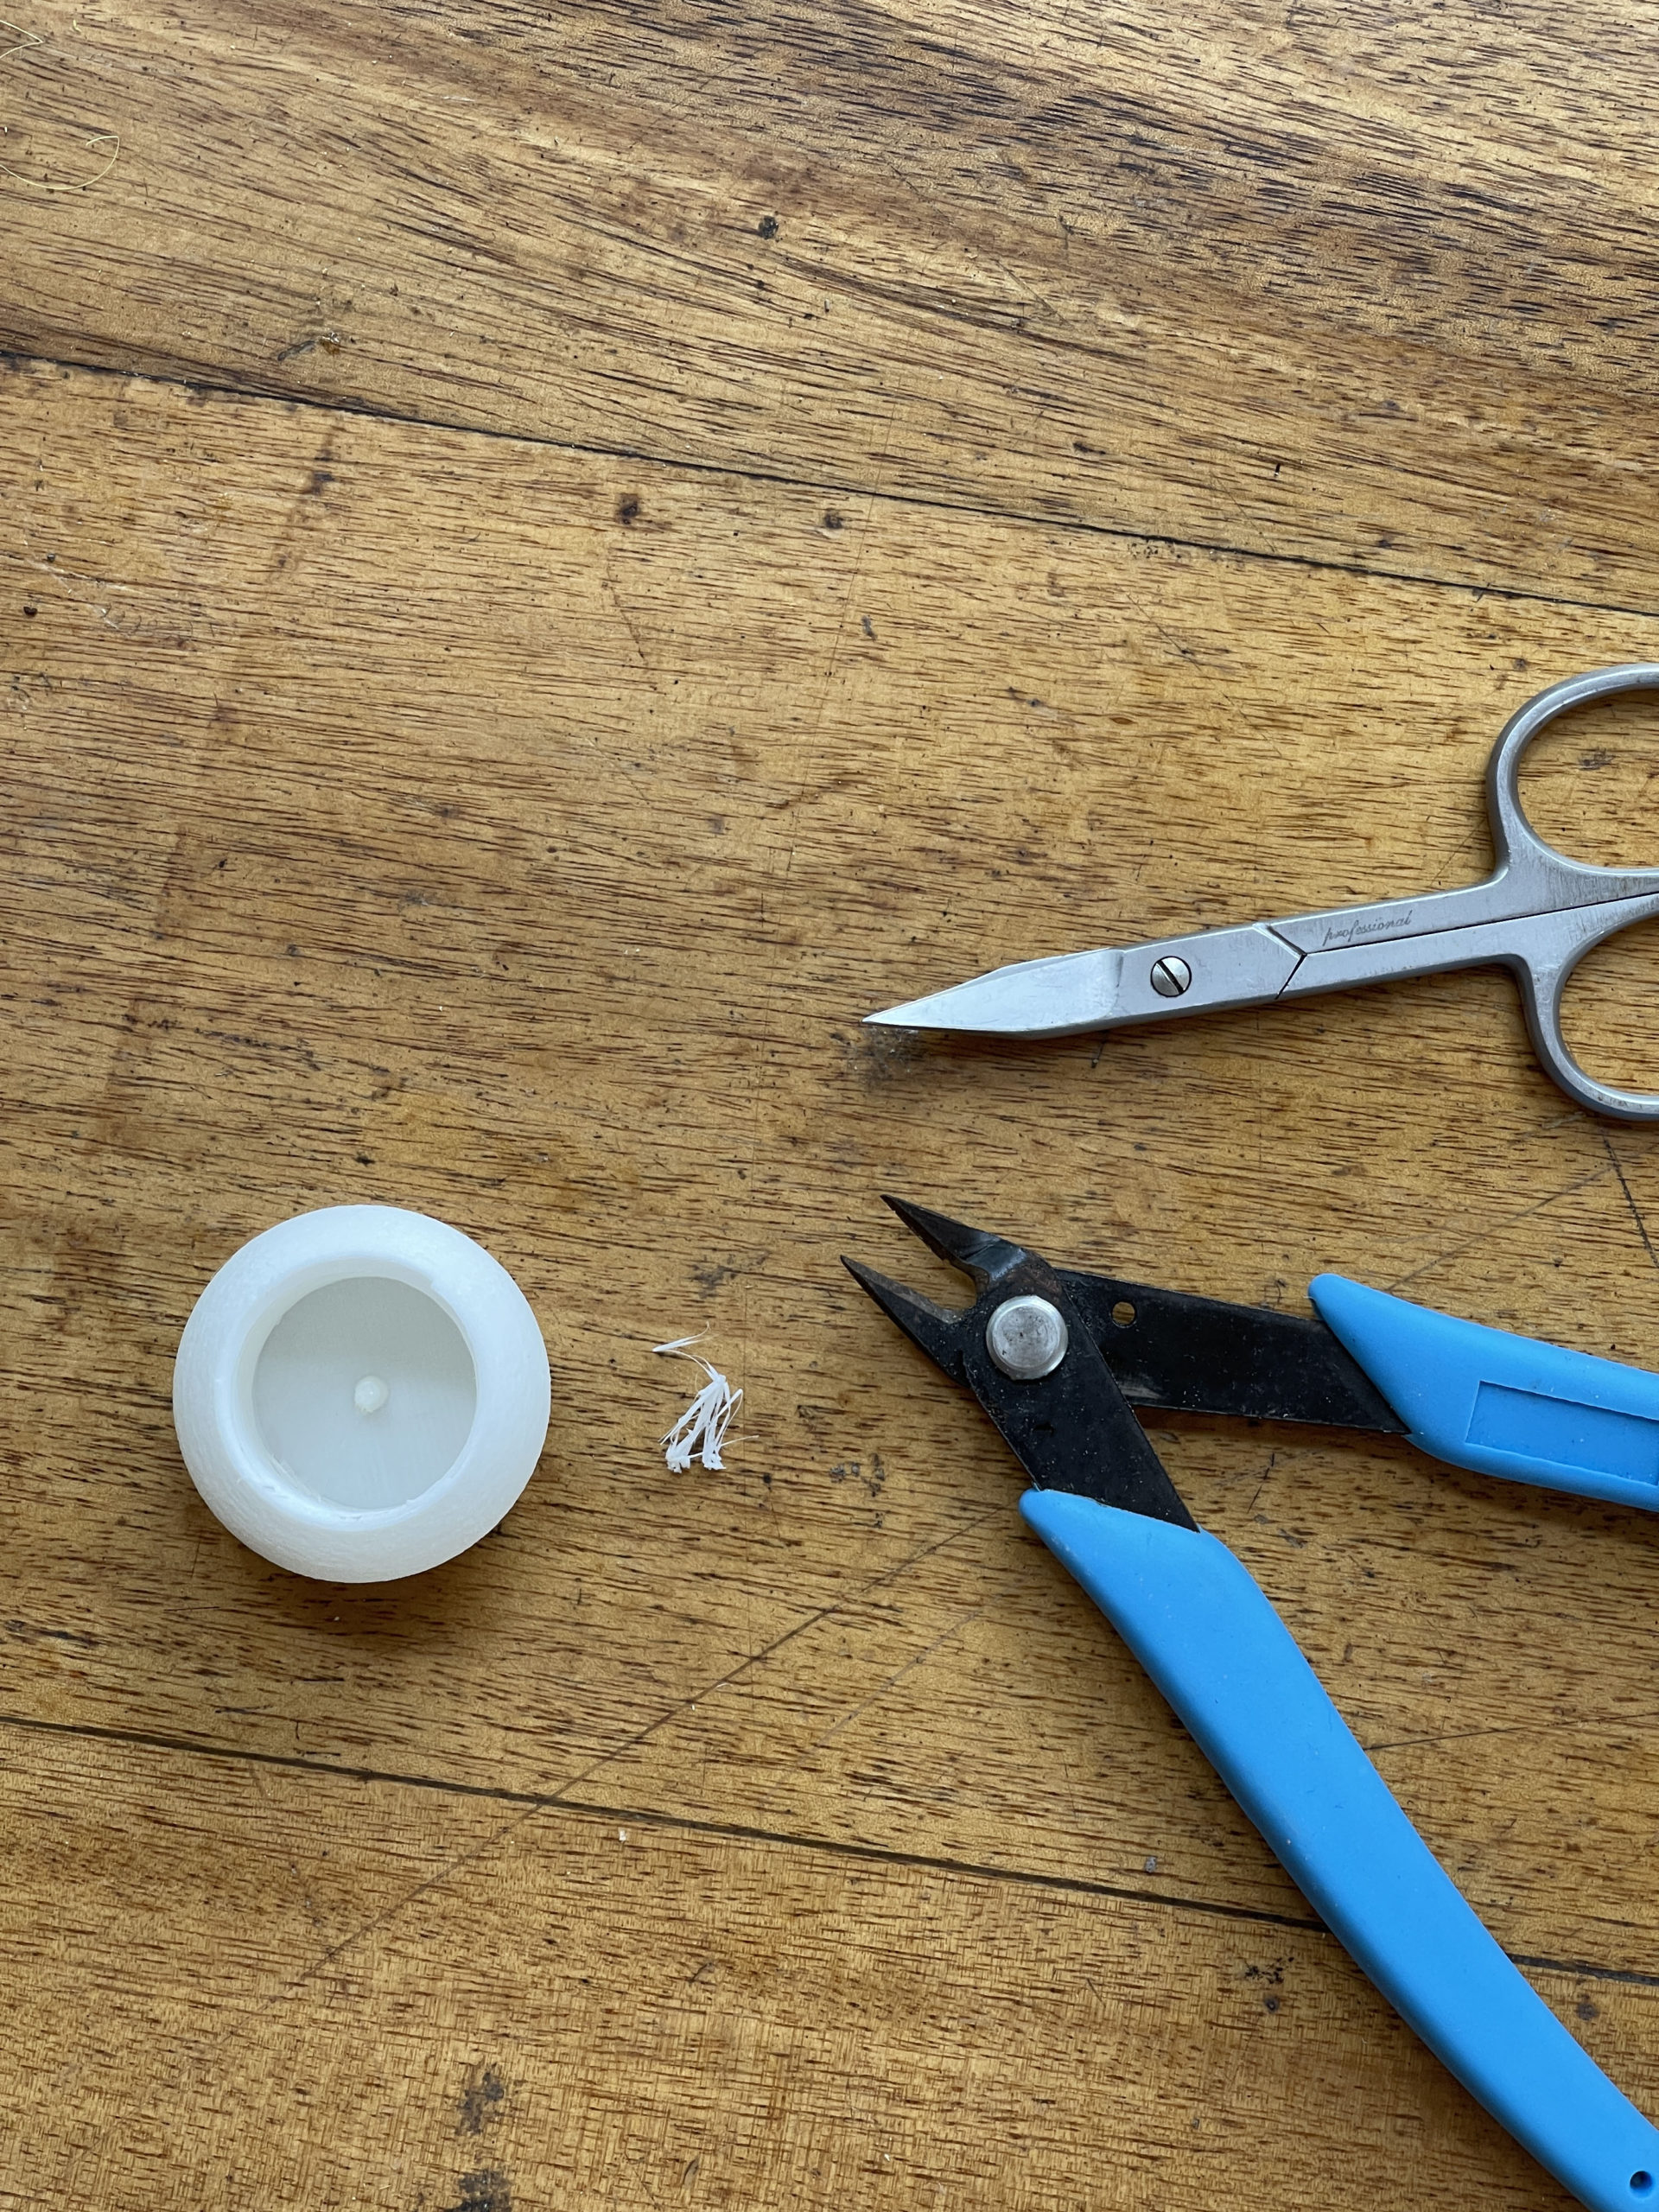
This feature is very useful with rigid filaments like PLA and ABS, however, with TPU filaments, retractions can be challenging and can result in clogging. That’s why it is highly advisable to disable retraction to prevent stretching and compressing of the flexible filament in the nozzle. We designed most models without need of retraction, but several parts needs a travel while printing. You can easily cut the strings after printing.
4 Over-extrude
Increase the Flow (Cura) or Extrusion Multiplier (PrusaSlicer) to 105% As TPU filaments can improperly extrude during the printing process, resulting in improper bonding of layers and perimeters. One way of dealing with this issue is to slightly increase your extrusion multiplier.
5 Placement of the material
The filament will be stretched while pulled which can lead to under-extrusion. Place the spool above the printer so the filament unwinds downwards which can reduce any resistance. It is advisable to have a printer with direct extruder. It is important for the path in which the filament travels to the melt zone to have tight tolerances, which can prevent any kinking or coiling.